Tuesday, 29 October 2013

Guror Handesh

Eid has just left us a few weeks ago, but the specialities cooked always linger for a week or two after.

A specialty cooked in almost 99% of Bangladeshi households, and one which for me it would not be Eid without, is guror handesh or fried rice flour cake made with molasses jaggery.

I have been trying to perfect this recipe since my first eid after marriage, but have mainly been unsuccessful. On the one occasion i had it perfected, a neighbour came over and asked me how i managed to get them perfect. Lo and behold, she gave my handesh the evil eye and they haven't been remotely good since! (I believe in superstition with my handesh. You should always say Ma Sha Allah!)

I searched high and low on the internet for different variations of a handesh recipe, and came across many that had baking powder, icing sugar or mixtures that needed to be left overnight. They all sounded daunting, and i started calculating how many packets of rice flour i may need, until my Angel, my mummy came to the rescue. A few nights before Eid, she came and made a mixture for me, and i watched with hawk eyes to ensure i didn't miss anything out in her steps. Needless to say, her handesh were PERFECT ( Ma Sha Allah).

Yesterday, both the husband and son were hmm-ing and haaa-ing about what to eat and as they both love handesh, i thought why not give it a go.

I used:
75g plain flour
175g rice flour
5 tbsp molasses jaggery
Approximately 200ml water(you may need more or less)
Fresh oil for frying

First i took my molasses jaggery and put it into a bowl. Then i added 200ml water and using my hands, combined the two ensuring no lumps remained.

In another bowl, i put the plain flour and rice flour. I added the jaggery mixture and mixed well using my fingers to smooth the batter out. The mixture was too thick so i added more water and mixed well again to incorporate all the ingredients well.

Once the batter was of a dropping consistency (it fell off fingers easily, but not like water), it is ready to fry.

It is important to use fresh oil in a freshly washed saucepan/wok.

Heat oil, once heated put oil on low - medium flame. Using a ladle, pour mixture into a teacup. Then using teacup, pour a small amount of batter in the oil, making sure batter pours in a round/circle shape. Allow the batter to come up to the surface and lightly put oil over the top. After a minute, turn over and fry the other side.

Drain on kitchen towel to absorb oil and fry the remaining batter.

My mummy told me that the first 2-3 never turn out well, and i have found this to be true! Persevere, and you too shall have perfect handesh!!

Now my husband can never say my handesh look like brains or kidneys :)

I hope you enjoy!

Yaz ♥

Sunday, 27 October 2013

Lachcha paratha/flaky paratha

My husband is a huge fan of parathas - especially on those days he comes home from work and doesn't feel like eating rice.

I have always pondered on the art of paratha making, but it was only after my visit to Bangladesh in January this year, that made me really want to learn to how to make it. In the restaurants in Bangladesh, nasta (breakfast) for us was mainly parathas with a simple mixed vegetable baazi. Simple fare but so, so tasty.

Here is the recipe i use to make my lachcha paratha, which is a many layered, flaky paratha. It's a difficult recipe, but i get a sense of accomplishment and pride when i make these.

I make my parathas using plain flour/maida, but you can use wholewheat flour/atta to make them. Just leave out the baking powder when using the atta.

You need:
2 cups plain flour/maida, plus extra for dusting
2 tbsp oil, plus more for layers and cooking
1/4 tsp baking powder
1 tsp salt
1 tsp sugar
3/4 cup warm water

In a bowl, mix all the ingredients except the water. Slowly add the water and mix till you get a sticky dough. Knead into a dough ball, pour a little oil over it, and cover with damp cloth for 30 minutes.

After 30 minutes, the dough should no longer be sticky. Knead a little, then seperate into 6 equal sized balls. Lightly cover with oil, then replace damp cloth.

After 5 minutes, remove one of the dough balls. Roll in your palms and dust with flour. Roll out until you get a very thin paratha. With a pastry brush, apply oil and dust flour all over.

Roll opposite sides of paratha tightly until they meet in the middle. Roll the paratha into a snail like coil keeping the two sides together. Turn the paratha flat into your hands and squash down. Dust in flour again and roll out very thinly.

Using a tawa or non stick pan, heat on a low flame, then spread some oil. Put the paratha on and allow to warm through. When bubbles form on the surface, put some oil on top of the paratha and flip over. Allow to cook through, then remove.

Repeat this with all your dough balls.

And there you have homemade flaky paratha. My son loves it on its own with some butter on it, or it's delicious with curry. Any way you eat it, just give it a go.

Hope you enjoy!!

Yaz ♥

Spicy Cabbage Baazi/Bhaji

Cabbage is one of those vegetables that is most disliked by people. Some might say it's yuck (check out my extensive vocab) and for some, it may remind them of their school dinners. I personally LOVE cabbage, just boiled, served with gravy. Yum!

Now, i wouldn't be Asian, or the Madame of Spices, if i didn't spice cabbage up, so here is a recipe for a simple cabbage baazi/bhaji or pan fried spicy cabbage.

You can use any variation of cabbage for this such as savoy or chinese cabbage. I used what was in my fridge - your bog standard white cabbage.

You need:

2 tbsp oil
1 tsp zeera (cumin) seeds
1/2 tsp hing (asafoetida)
1/4 inch ginger, grated
2 cloves garlic, grated
2 small onions, thinly sliced
1/4 yellow capsicum, chopped
1/4 green capsicum, chopped
Salt to taste
1 tsp turmeric powder
1/2 tsp chilli powder
1 tsp mild curry powder
1 tsp dhaniya (coriander) powder
1/2 tsp zeera (cumin) powder
1/2 cabbage, thinly chopped
2/3 green chillies (i didn't have any at home so i used 5 small red dried chillies)
Chopped coriander

In a frying pan, heat your oil. Add your zeera and hing, and fry for a minute. Then add your ginger and garlic and try till light brown.

Add your onions, capsicum and salt and fry on low - medium heat until softened. Add all your spices, a little water and allow to fry for 3 - 4 minutes.

Add your cabbage, turn the heat down, cover and allow to fry for 15 minutes. Leave it on a low flame as you do not want it to burn and you do not want to add any more water. It will be a dry side dish.

Check after 15 minutes to see if cabbage is cooked. If you would like it even more mushy, allow to cook more. I prefer cabbage with bite to it still.

Garnish with your chillies and coriander.

Et voila, your side dish is complete. Tastes delicious with rice or paratha and with a main dish like chicken bhuna.

Hope you enjoy!

Yaz ♥

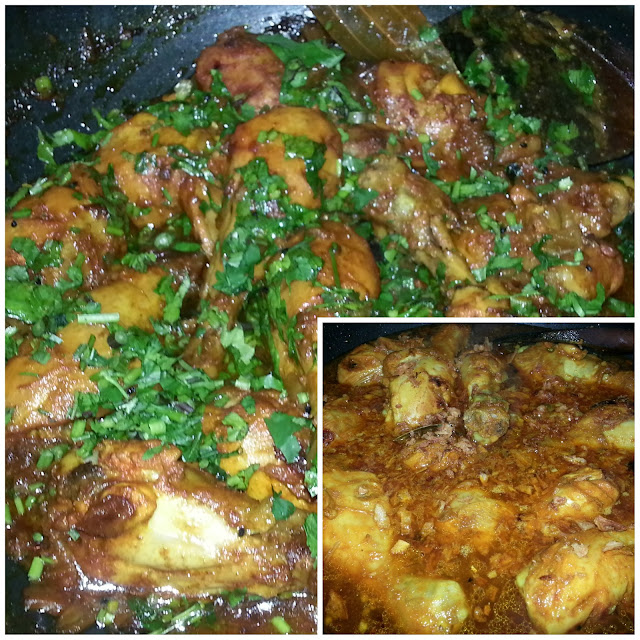
Dry Chicken Bhuna

Chicken is an extremely versatile ingredient, with which a billion and one dishes can be made. I don't understand when people say chicken is bland, because i've always found that it sucks in flavour like a sponge with water - if cooked correctly.

I've cooked a dish today, which i have been frequently making due to my son favouring it's drier texture - whether he eats with rice or on it's own.

It's a Bangladeshi style chicken bhuna dish - Bangladeshi style because the dish lacks the use of curry or mixed powder - mild or hot.

For this recipe, i used:

12 drumsticks (baby chicken ones)
1 tsp turmeric powder
1 1/2 tsp chilli powder (more or less to taste)
1 1/2 tsp zeera (cumin) powder
1 1/2 tsp dhaniya (coriander) powder

Score the drumsticks then mix all above spices on the drumsticks well and keep to one side.

I then used:

2 tbsp oil
1 tsp panch puran (5 spice)
3 cardamoms
2 cinnamon sticks
3 bay leaves
4 peppercorns
3 cloves
2 medium onions chopped
1 inch ginger
6 cloves garlic
Salt to taste
1 tsp sugar
1 tbsp beresta (fried onions)
Chopped coriander

In a wok, add the oil. Once heated, add the dry spices and allow to infuse oil. After a minute, add the onions and fry on high heat until golden brown. Watch that the onions don't burn.

Once golden, add garlic, ginger and salt and fry for a minute. Then spread the drumsticks evenly on the bottom of pan. You want to roast them on the onions on a medium heat for about 3 - 5 minutes then turn over gently to fry for another 3 - 5 minutes.

After both sides are done, add approximately 400ml water (more if you want more sauce), the sugar, beresta and cover. Allow to cook for 10 minutes. Check to see if you need more water, but this is not a saucy dish so you may not need any more. Once cooked, turn off heat and garnish with chopped coriander.

Obviously, you can add vegetables to the cooking process if you prefer, like potatoes or shatkhora (Bangladeshi citrus fruit) but sometimes it's just nice nillah (no veggies).

Serve with rice, naan, roti or as my son prefers - on it's own!!

Hope you enjoy!!

Yaz ♥

Saturday, 26 October 2013

Tandoori Chicken Wing Masala - the way to your other half's heart ♥

I am an absolute glutton when it comes to anything tandoori - anything tandooried is bound to be tasty in my book. Reminds me of my sinifaan (engagement) where i could have cared less that my in laws were there. Just wanted them to go so i could tuck into my Dad's special Tandoori Chicken (bless abba, he kept loads aside for me).

So this is a tandoori wings recipe - even though the wings aren't tandooried (is that even a word!?) You will be marinating the wings for 48 hours, which ensures such a deep flavour, you'll wonder how you've never cooked them before!

You will need:

2kg wings/niblets (wings should be scored on both sides)

Marinated in:
500g Yoghurt
4 green chillies
1 tbsp methi leaves
1/2 tsp turmeric powder
1 tsp chilli powder
2 tsp garam masala
1 tsp zeera (cumin) powder
1 tsp dhaniya (coriander) powder
1 medium onion
2 tbsp lemon juice
2 tbsp coriander
1 inch ginger
5 cloves garlic
Salt to taste (i use about 3 tsp)

Put all above ingredients apart from yoghurt into a blender/food processor and blend well. Mix into yoghurt then pour entire mixture over wings and coat well. Cover and refrigerate for 48 hours (you can do it for 24 hours too).

Take chicken out of fridge 2 hours before you eat. Pre heat oven to gas mark 5, then line a baking tray or grill tray with foil. Lightly baste the tray with oil. Spread wings out and cook for 20-25 mins turning once in between. Once cooked, keep in a bowl to one side.

For moshla (masala):
3 tbsp oil (i like adding 1 tbsp ghee instead if 1 tbsp oil)
2 tsp paanch puran (5 spice or mix of cumin seeds, fennel seeds, mustard seeds, methi seeds and nigella seeds)
2 cinnamon sticks
2 cardamoms
3 bay leaves
4 peppercorns
3 cloves
1 inch ginger, grated
5 cloves garlic, grated
5 large onions, sliced thickly
1-2 yellow capsicum, thick slices
1-2 green capsicum, thick slices
Salt to taste
1 1/2 tsp hot madras curry powder
1 tsp turmeric powder
1 tsp chilli powder
1 tsp dhaniya (coriander) powder
1 tsp zeera (cumin) powder
1/2 tsp garam masala
Chopped coriander

In a thick bottomed pan, pour your oil and allow to heat. While on medium heat, add in all your dry spices and allow to infuse oil for a minute. Add your garlic and ginger and brown slightly. Add the onions and stir well.

When onions go slightly transluscent, add in the capsicum and salt. Again stir well. Onions and capsicum may stick slightly to bottom of pan. Continue stirring, adding a little bit if water if sticks too much. After 10 minutes, when onions and capsicum are both browned, add in your spice powders and a little water. Continue stirring, then turn heat down. Cover and allow to steam for about 5 minutes.

If you would like to eat your wings and masala seperately, add coriander to masala at this point and serve seperate. However, i like adding the wings to the onions. I stir and cover for 5 minutes to allow flavours of wings and onions to fuse together, then finish with coriander.

Serve with fried rice, basmati or naan.

The aroma from this dish always travels upstairs and despite my husband being a night worker, he always wakes up to the fragrance. This is a husband proof dish most definitely. A word of advice - always make a few extra wings and hide them somewhere no one but you knows. I do :)

Please let me know what you think of this dish, and definitely if you cook it. You do have to be patient a few days,  but it is so so so worth it!

Enjoy!

Yaz ♥

Assalamu Alaikum, Hello and Welcome!

Firstly, let me introduce myself. My name is Afsana Ahmed, aka Yazmin, aka Amma (mum in Bengali). For the purposes of this blog, I am Yaz :)

I am an almost 27 year old British Bangladeshi woman, wife to guinea pig Kamran Ahmed and mummy to almost 2 year old Aqib Deen Ahmed.

My first love in life is my family. My second love in life is food. I love food. Simple. If logistics and financials allowed, i would feed the entire planet. Truly. However, i will have to make do now with feeding people via this blog. Be it via drooling over my photos (they are drool worthy) or following recipes i use, i will feel that i have fed even one more person. You are all welcome to my home by the way!!

I recently posted a few photos of food on Facebook and Instagram and i was being asked for recipes. I was posting recipes under pictures or messaging people, and i was thinking there must be an easier way to do this. Then i thought why not give this blogging malarkey a go. I mean i am known for talking a lot, so this would be the perfect platform for unleashing my food ideas, cooking, recipes - anything and EVERYTHING food related.

So here we are. I will kick start this blog off with a photo of my spice cupboard. I have reused coffee jars and other containers for storing spices - so don't judge a jar by it's cover!!

I hope you all like my blog. I would appreciate any feedback, positive AND negative.

Thanks in advance for checking out my blog!!

Yaz ♥